Posted by A Mayes Pottery on Jun 13th 2025
How Clay Stamps Transform Your Ceramics Into One-of-a-Kind Creations
Clay Stamps Can Transform Your Ceramics Into One-of-a-Kind Creations
Creating pottery by hand is a wonderful blend of artistry, tradition, and creativity. Whether you’re a seasoned potter or just starting your clay journey, adding texture and patterns to your clay is a powerful way to make your piece truly unique. Clay stamps are a popular tool for adding charming details, texture, and character to your pottery — transforming a simple mug, plate, or bowl into a handcrafted masterpiece.
What Are Clay Stamps?
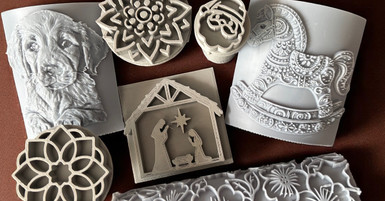
Clay stamps are small, durable tools — often 3D printed from filament or resin — that imprint a pattern, logo, or texture into clay while it’s still soft and pliable. They come in countless designs, from flowers and leaves to geometric patterns and personalized initials. The stamp leaves a shallow, raised or recessed imprint, adding depth and texture to your piece.
Why Use Clay Stamps?
Using clay stamps lets you:
✅ Save Time: Instead of painstakingly sculpting details by hand, you can simply press a stamp into clay to achieve intricate designs quickly.
✅ Add Consistency: Clay stamps help you produce uniform patterns across a set of items — perfect for creating matching dinnerware, coasters, or tile sets.
✅ Boost Creativity: Combine stamps in different patterns, sizes, and designs to produce something completely unique and distinctly “you.”
✅ Personalize Your Work: Clay stamps can feature initials, logos, or custom motifs, adding a personal touch to your pottery — perfect for giftware or special orders.
How To Use Clay Stamps
Using clay stamps is a simple process:
-
Roll Out Your Clay: Begin by rolling a smooth, even clay sheet. Then build your clay piece or continue on to make an embellisment.
-
Choose Your Stamp: Select a clay stamp with a pattern or texture you love.
-
Press Firmly Into Clay: Gently but firmly press the stamp into the clay's surface. Experiment with pressure to find the depth you want. If you have any issues with the stamp or cutter sticking to the clay then brush with cornstarch or spray with cooking spray.
-
Remove Carefully: Lift the stamp straight up to avoid smudging the imprint.
-
Repeat or Combine: You can stamp a single motif or create a pattern by repeatedly stamping across the clay’s surface.
-
Dry and Finish: Once you’re finished stamping, allow your piece to dry to leather hard, then proceed with trimming, smoothing, and firing in your kiln.
Tips for Success
➥ Test First: Try your stamp on a small piece of clay first to check depth and pressure.
➥ Clean Between Imprints: Clay can stick to your stamp; cleaning it regularly prevents unwanted clay buildup.
➥ Consider Clay Consistency: Clay that’s too wet may warp under pressure; clay that's too dry may crack. Ideally, it should be firm but pliable — leather hard — for the best results.
Final Thoughts
Using clay stamps to texture your pottery is a wonderful way to add character, artistry, and a unique touch to your handmade ceramics. Whether you’re making a set of matching dishes or designing a personalized mug, clay stamps allow you to express your creativity in a whole new way. So grab your clay, select your stamps, and start adding a bit of magic to your pottery today!

